For the first week of 3D production, our initial practice was to test and familiarize ourselves in animating through 3D software using a rig on Maya.
For mine I wanted to get a shock reaction where you would see a dead body in front of you .The scenario takes place through someone walking casual down a back alley, he sees and jumps to seeing the body on the floor ending with a gasp, hand over mouth motion. Then as the information kicks in that the person is dead, the figure goes into a moving back, vomiting gesture.
This link shows my first draft of the shock scene posted on Vimeo but still might needs tweaking.
https://vimeo.com/119282106
Most comments I got in terms of improvements included better timing and better walk cycle when he goes for the initial shock then moving backwards.
Wednesday, 11 February 2015

Monday, 9 February 2015
5AD008: week 2 (9th Feb 2015) class analyse of Rembrandt's 'the Jewish Bride'
As part our learning into research, the whole class worked on observing and analysing a painting called 'The Jewish Bride' By the painter, Rembrandt based on looking at it in a narrative/story perspective, the visual elements that explains the situation and also how the artist uses the lighting within the painting to represent the theme.
 Through a plot, my own scenario was that this was a royalty or nobility marriage which in most cases back in the 17th century was arranged marriages. In this case, the story behind the two people is that she is not happy for this arrangement, but he is happy and doesn't care how she feels about the situation. Others thought that the father is giving the daughter away for a number of reasons including the gain of alliances and expanding the family empire or in a religious aspect, gaining respect or power for marrying into a highly religious family.
Within the visuals, there are a number of things that could explain the plot elements above. Firstly, they're both wearing rich, expensive clothing from the contrast of gold and vibrant red colours and the amount of jewellery the female figure is wearing which also shows they were probably expensive. Secondly, the emotional status displays she isn't happy for the arrangement as we thought she looks more sad and depressed but the expressions situated display that she has no choice in the matter as women didn't have a voice in society back then as they do now in the 21st century. This would be the same with the way her eyes are looking down as to show she's not comfortable with this, as in a normal aspect, newlyweds would look at each other with displays of happy emotions. Thirdly, what most of the class got from the groom is that from his facial expressions, eye contact and hand gestures, it clearly showed the bride is his property. Furthermore, when he is touching her inappropriately around the breasts with a smiling gesture, it displays his uncaring, self-adsorbed personality that he is only in it for himself and thinks he can do whatever he likes.
From the lighting, the artist concentrates more on the aspects of producing a dark, eerie and early modern presentation. What we all thought aswell is that the dark setting around the couple shows that these two are the centre of attention in the narrative side of the painting. Also the lighting around the clothing colours brings out the shine of displaying their nobility background and rich lifestyle to the observers.

Within the visuals, there are a number of things that could explain the plot elements above. Firstly, they're both wearing rich, expensive clothing from the contrast of gold and vibrant red colours and the amount of jewellery the female figure is wearing which also shows they were probably expensive. Secondly, the emotional status displays she isn't happy for the arrangement as we thought she looks more sad and depressed but the expressions situated display that she has no choice in the matter as women didn't have a voice in society back then as they do now in the 21st century. This would be the same with the way her eyes are looking down as to show she's not comfortable with this, as in a normal aspect, newlyweds would look at each other with displays of happy emotions. Thirdly, what most of the class got from the groom is that from his facial expressions, eye contact and hand gestures, it clearly showed the bride is his property. Furthermore, when he is touching her inappropriately around the breasts with a smiling gesture, it displays his uncaring, self-adsorbed personality that he is only in it for himself and thinks he can do whatever he likes.
From the lighting, the artist concentrates more on the aspects of producing a dark, eerie and early modern presentation. What we all thought aswell is that the dark setting around the couple shows that these two are the centre of attention in the narrative side of the painting. Also the lighting around the clothing colours brings out the shine of displaying their nobility background and rich lifestyle to the observers.
Sunday, 8 February 2015
5AD008: Week 1 (2nd- 9th feb 2015) eadweard murbridge
Eadweard Muybridge

 This man from late 19th century instigated the creation of motion picture, inspiring future film industries through his creative technique of moving picture formed into an animation using a zoopraxiscope he invented. What this device basically does is rapidly project images of stop motion movements after their individual motions are imprinted photographically onto a glass disk then coloured by hand.
The link below shows how he would used this method for creating the horse in motion.
https://www.youtube.com/watch?v=QLnxy_5Bpnc
What the reason was for this creative method started through having a different perspective in how motion should be viewed to get a big understanding of the subject matter. This would be better than seeing one form of movement in a still.
A great example of birthing this technique came when he was placed into a bet by racehorse owner Leland Stanford where people speculated and constantly opinionated whether a single horse movement should be shown from one point of view and show how to prove that all legs of a horse can leave the ground from a scientific perspective. This likely happened when he observed portraits showing all four hooves of horses leaving the ground, presented in one galloping still motion and believing this is not how people should see horses.
 But his method wasn't approached at first liking as the person who placed him within this argument thought the moving images of a horse running was too fast for the eye to take a full understanding of this animation. But over time his method was perfected through his experimentation with a range of cameras until inventing his own process and even studying movement in a professional way in both humans and animals. His experimentation concluded with years worth of image sequences, most in different angles to get new perspective on the action taking place. In one way people viewed these pieces as scientific experimentation in movie making but other people viewed them as artwork because they looked more like he created a new artistic movement.
Even after his death, his professional practice and fundamental approach has been used in films to this day. One popular example of this came from John Gaeta using the principles of murbridge's zoopraxiscope to film the famous bullet time visual effect to film sequences in the first matrix film including the roof scene.Click here for the see scene.
The web link below this line shows how those scenes in matrix are produced through the fundamental stages, then the final cut. https://www.youtube.com/watch?v=uPNBdDNZbYk
This sort of example that is approached to film making can be greatly executed with the use of equipment that wasn't available for eadweard. This also shows that this technique can be improved to suit the formula in each film's theme and further inspire other film corporations and directors to do the same approach in their own media besides just films like tv shows or animations.
Click here to see how other industries stylized bullet time through their own approach.


Another example of zoopraxiscope influencing diverse people is Harold Eugene edgerton as muybridge's idealism greatly inspired his work through high speed photography to film slow motion or fast sequences. The fundamentals of zoopraxiscope pioneered him to be known as the man who can freeze time in his film making. This can be shown from his use of a stroboscope which is a camera that captures film in the form of multiple images placed onto a single photo plate. This means the plate is capturing individual exposure shots in motion whilst on top of the stroboscope's lens just like the zooprxiscope. From the help of eadweard Muybridge's method, Harold furthered the process through using each motion shot to appear in slow motion using a electronic flash, allowing slow motion to be captured in place to how he want the film direction to go.


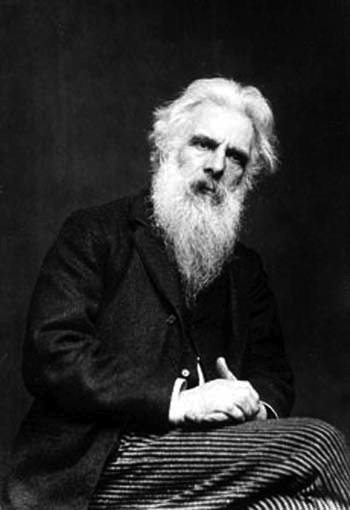 This man from late 19th century instigated the creation of motion picture, inspiring future film industries through his creative technique of moving picture formed into an animation using a zoopraxiscope he invented. What this device basically does is rapidly project images of stop motion movements after their individual motions are imprinted photographically onto a glass disk then coloured by hand.
The link below shows how he would used this method for creating the horse in motion.
https://www.youtube.com/watch?v=QLnxy_5Bpnc
What the reason was for this creative method started through having a different perspective in how motion should be viewed to get a big understanding of the subject matter. This would be better than seeing one form of movement in a still.
A great example of birthing this technique came when he was placed into a bet by racehorse owner Leland Stanford where people speculated and constantly opinionated whether a single horse movement should be shown from one point of view and show how to prove that all legs of a horse can leave the ground from a scientific perspective. This likely happened when he observed portraits showing all four hooves of horses leaving the ground, presented in one galloping still motion and believing this is not how people should see horses.

Even after his death, his professional practice and fundamental approach has been used in films to this day. One popular example of this came from John Gaeta using the principles of murbridge's zoopraxiscope to film the famous bullet time visual effect to film sequences in the first matrix film including the roof scene.Click here for the see scene.
The web link below this line shows how those scenes in matrix are produced through the fundamental stages, then the final cut. https://www.youtube.com/watch?v=uPNBdDNZbYk
This sort of example that is approached to film making can be greatly executed with the use of equipment that wasn't available for eadweard. This also shows that this technique can be improved to suit the formula in each film's theme and further inspire other film corporations and directors to do the same approach in their own media besides just films like tv shows or animations.
Click here to see how other industries stylized bullet time through their own approach.

Another example of zoopraxiscope influencing diverse people is Harold Eugene edgerton as muybridge's idealism greatly inspired his work through high speed photography to film slow motion or fast sequences. The fundamentals of zoopraxiscope pioneered him to be known as the man who can freeze time in his film making. This can be shown from his use of a stroboscope which is a camera that captures film in the form of multiple images placed onto a single photo plate. This means the plate is capturing individual exposure shots in motion whilst on top of the stroboscope's lens just like the zooprxiscope. From the help of eadweard Muybridge's method, Harold furthered the process through using each motion shot to appear in slow motion using a electronic flash, allowing slow motion to be captured in place to how he want the film direction to go.
- http://www.biography.com/people/eadweard-muybridge-9419513#photographic-discovery
- http://americanhistory.si.edu/muybridge/
- http://blog.europeana.eu/2012/04/the-science-of-movement-eadweard-muybridge/
- http://en.wikipedia.org/wiki/Zoopraxiscope
- http://edgerton-digital-collections.org/videos/hee-fv-038
- http://www.bbc.com/future/story/20140722-the-man-who-froze-the-world
- http://makezine.com/projects/make-24/stroboscope/
Thursday, 5 February 2015


Thursday, 22 January 2015
character development (final outcome and evaluation)
This post shows the final outcome to presenting my character Margaret on
screen with information on sound reference links and one of the filming
footages I've used for the rotoscoping methods before filling in the
right character shapes and features in the outcome.
footage, clips and soundtrack referencing
These two vids are filmed references I used for the rotoscoping stage of quickly sketching the movements on tv paint.
These links below show the audio I used for the lip sync and theme song for the animation
Theme song:
voice:
Margaret (final outcome)
This vid shows my final outcome to presenting my character on screen
Character development module evaluation and reflection.
In the character development module, our goal was to develop
and produce our own unique character. The first process was to produce two character
ideas inspired by research that could help with the unique scenario of each one
in terms of emotions, characteristics, backstory and personality. This was
through grabbing personality traits and characteristics from people through the
form of quick sketching from primary research. I also explored different
internet sites to look for articles that could fill the back bone of what can
make my characters different and be able to develop further.
The two characters I produced included Carson, a veteran
solider and Lady Margaret, a self-centred, vicious young woman who thinks she
is beauty. After viewing both characters to an audience, they chose the best
one that was more believable which Lady Margaret was.
Once chosen our next approach was to develop the character
further through the forms of sketching a lot of drawings to develop the perfect
shape and features through all body parts, suitable for her personality and for
the production stage; producing initial concept arts that reflects the
character in different stylized ways; creating a Marquette to see her from a 3D
perspective; and a line test to show how she reflects her smug attitude through
her walk cycle.
The production process was to animate the character to see
what she would look like on screen. The stages included line tests of how she
would move from gestures, common traits and walk cycles; lip sync to display
how she would talk in situations with her movements to show more of her
personality and a ten second cut with colour to show what she would look like
in the final stages of production. This main stage was done through the
software of TV paint. This was helped with my own filmed footage of movements
and adding a theme and voice soundtrack taken from YouTube to create an atmosphere
and vibe with her personality.
The best part of this animation module is learning that
there are many ways to create the perfect character for on screen. It also gave
me freedom to explore how to make my character better with help from feedback.
I also enjoyed creating different approaches to character development including
2d and 3d perspectives.
What I like to improve is too keep on exploring ways of
developing my characters further, mainly through drawings to give them that
edge to succeed if published on screen. Another would be to improve animating
skills when crafting more solid drawings within every frame to look less loose
and more understandable to get the full picture and start drawing free hand
without rotoscoping but still using the footage I use as only reference. This
would also help with the lip syncing methods aswell. The last thing I would
like to improve is more planning to be more grounded in exploring the right
options to develop my character. This would show how her presentation can be
unique and different from planning ways of animation styles and producing the
right design workflow on facial and body shapes. And this would help show what
can be further improved in changing the plan or adding another drawing method
into the mix if the character isn’t appealing enough.
Subscribe to:
Posts (Atom)